Radar
Radar helps you identify database instances and verify whether they are actively monitored by the DAM Agent.
Radar compares database information obtained from inventory and Discovery sources with the databases monitored by Data Touch. This helps identify database instances that are not currently monitored and may require further investigation.
The Radar menu contains the following submenus:
- UCMDB
- Excel
- Discovery Integration
UCMDB
The UCMDB page displays the configured UCMDB integrations that provide database inventory information to Radar.

Synchronize UCMDB data
Use the synchronization action for a UCMDB integration to retrieve the latest database inventory information from UCMDB.
Data Touch updates the corresponding Radar data based on the retrieved information.
View UCMDB Discovery Results
Select UCMDB Discovery Results from the Actions column to view the database instances retrieved from the selected UCMDB integration.
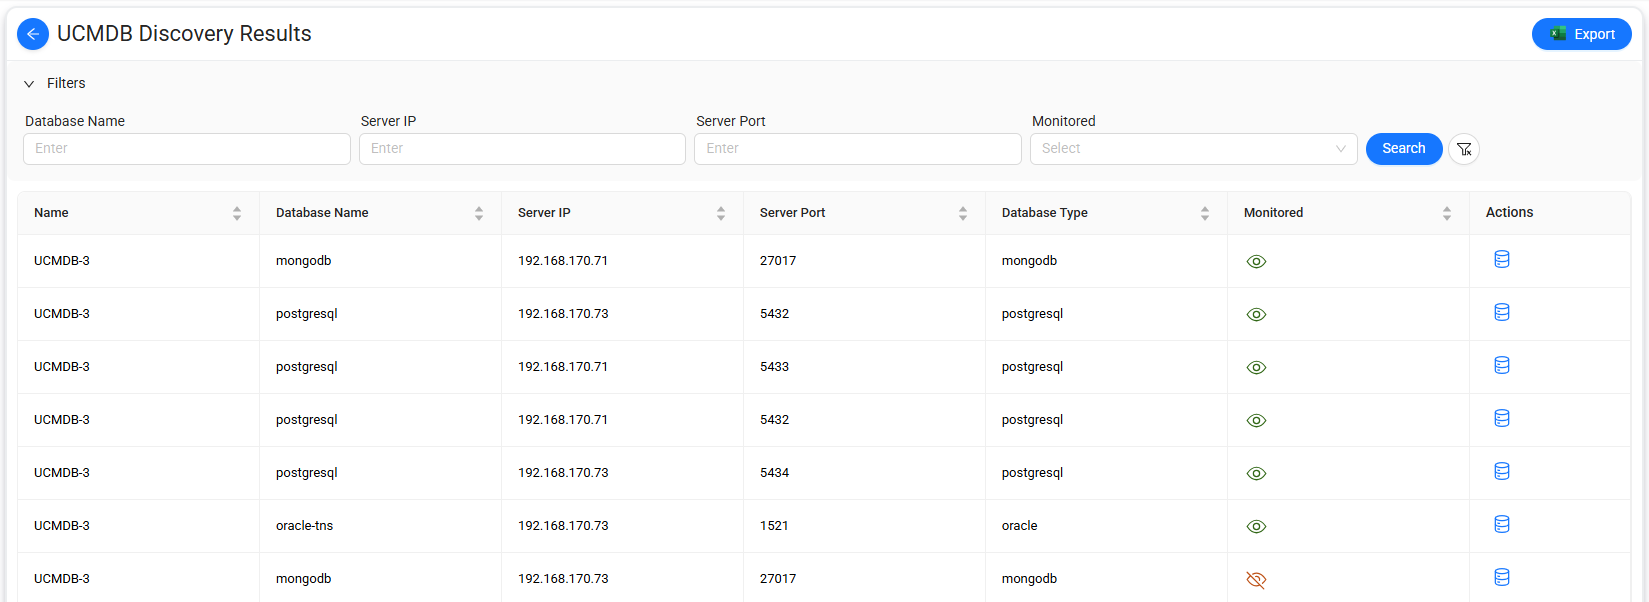
The discovery results provide database connection and monitoring information for the database instances stored in UCMDB.
You can filter the results to narrow the displayed database list.
To export the filtered results to an Excel file, select Export.
The monitoring information helps you determine whether each database instance identified in UCMDB is actively monitored by the DAM Agent.
Data Source Definition
Select the Create Data Source icon  in the Actions column to open the New page under the Settings > Data Source submenu.
Use the Create page to configure a Data Source for the corresponding discovered database asset.
Excel
The Excel page allows you to import, review, and manage database inventory information from Excel files.
Radar compares the imported database information with the available monitoring information to indicate whether each database instance is monitored by the DAM Agent.
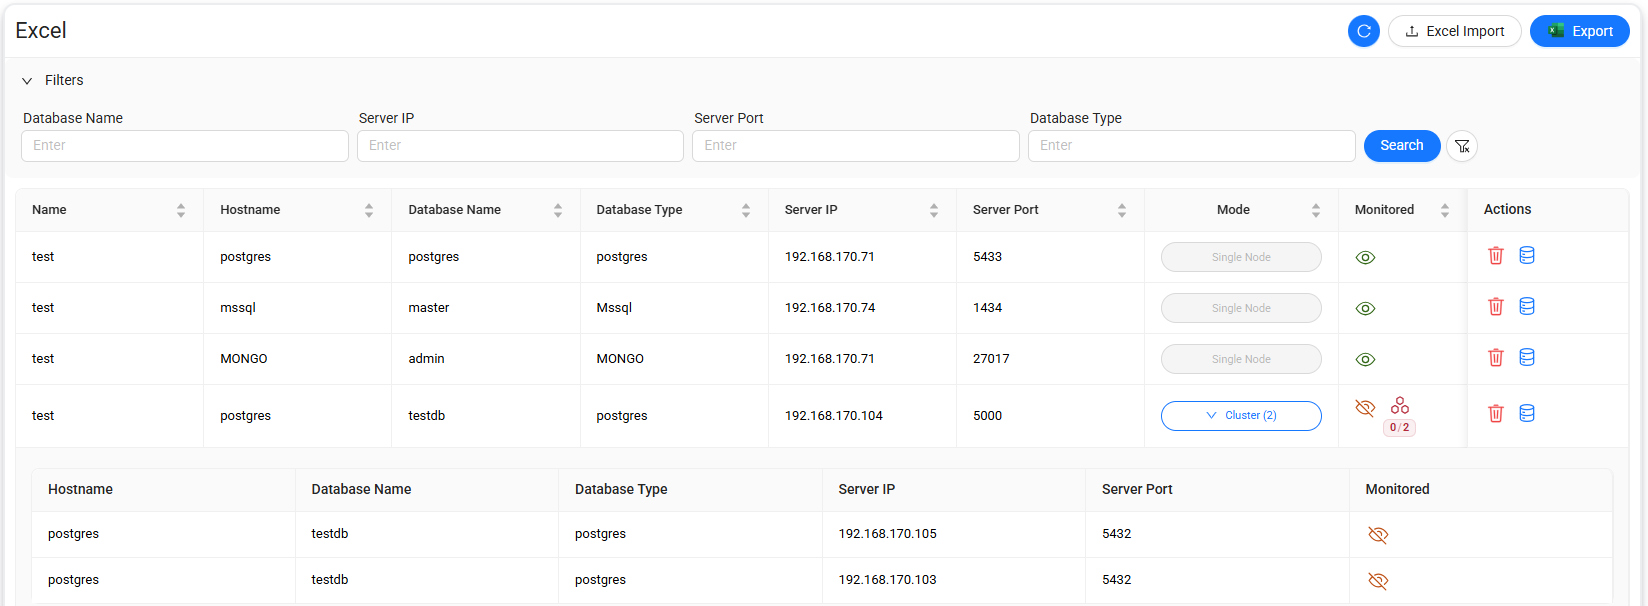
Excel database list
The list includes the following information:
| Column | Description |
|---|---|
| Name | Name associated with the imported database record. |
| Hostname | Hostname of the database server. |
| Database Name | Name of the database. |
| Database Type | Type of database, such as PostgreSQL, Microsoft SQL Server, or MongoDB. |
| Server IP | IP address of the database server. |
| Server Port | Port used by the database server. |
| Mode | Indicates whether the database is configured as a single node or part of a cluster. |
| Monitored | Indicates whether the database is currently monitored by the DAM Agent. |
| Actions | Actions available for the database record. |
Database mode
The Mode column identifies the database topology.
The following modes can be displayed:
- Single Node — The database is represented by a single database instance.
- Cluster — The database consists of multiple nodes.
For clustered databases, the cluster indicator also shows the number of detected or monitored nodes.
Select the cluster entry to expand the row and view its member nodes.
The expanded list includes:
| Column | Description |
|---|---|
| Hostname | Hostname of the cluster node. |
| Database Name | Database name associated with the node. |
| Database Type | Database type of the node. |
| Server IP | IP address of the node. |
| Server Port | Port used by the node. |
| Monitored | Indicates whether the individual node is monitored. |
This view helps you identify monitoring coverage at the individual node level for clustered database environments.
Import database information from Excel
Select Excel Import in the upper-right corner to import database inventory information from an Excel file.
After the import is complete, Data Touch adds the imported database records to the Excel list.
Export Excel records
Select Export to export the displayed database records to an Excel file.
If filters are applied, the export contains the filtered results.
Refresh the Excel list
Select the Refresh button in the upper-right corner to retrieve the latest information displayed on the page.
Data Source Definition
Select the Create Data Source icon in the Actions column to open the New page under the Settings > Data Source submenu.
Use the Create page to configure a Data Source for the corresponding discovered database asset.
Discovery Integration
The Discovery Integration page displays database assets identified through Data Touch Discovery integrations and shows their relationship with monitored database instances.
Use this page to determine whether discovered database assets are matched with a known data source and whether they are actively monitored by the DAM Agent.
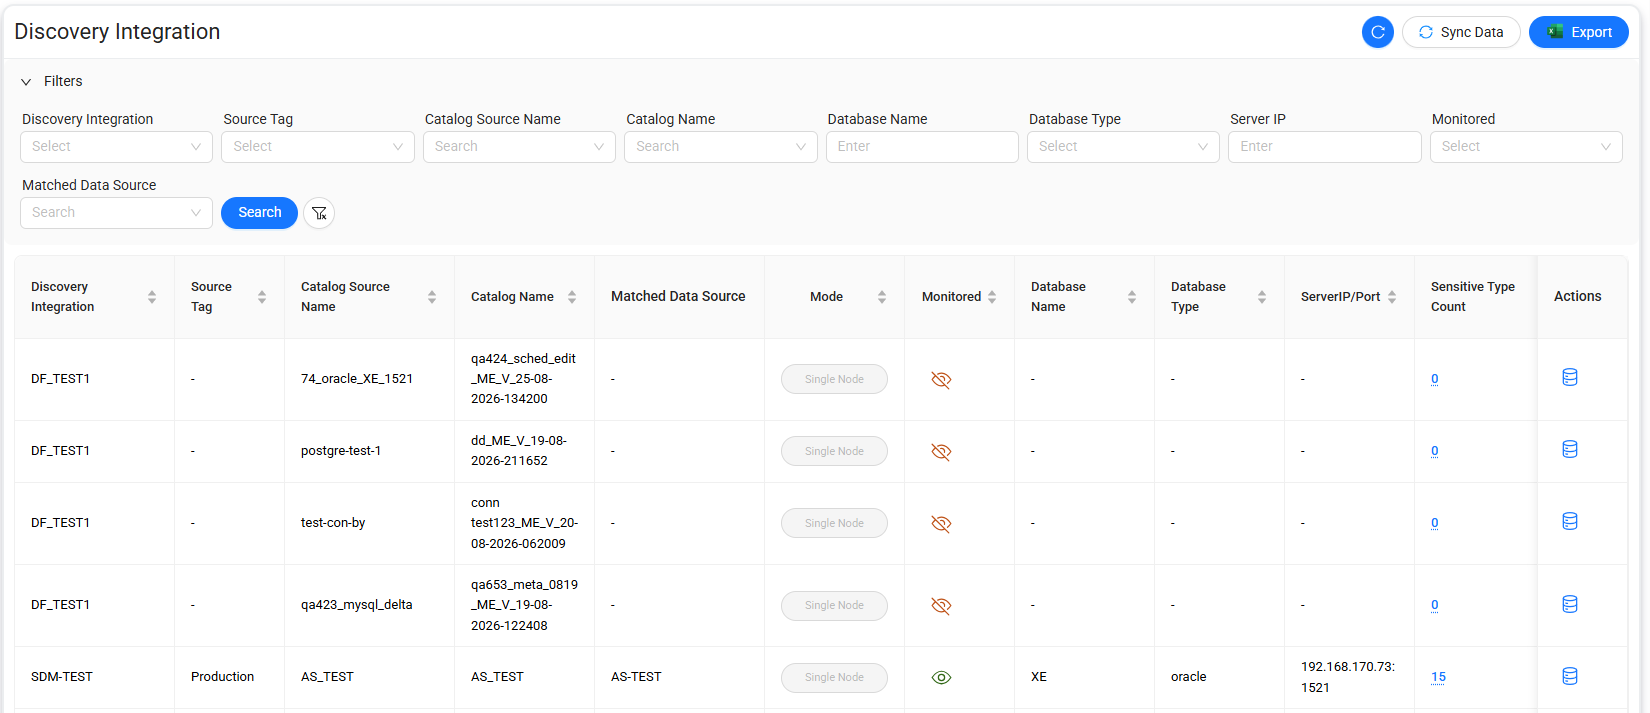
Discovery Integration list
The list includes the following information:
| Column | Description |
|---|---|
| Discovery Integration | Discovery integration through which the database asset was identified. |
| Source Tag | Source tag associated with the asset. |
| Catalog Source Name | Source name received from the catalog or Discovery integration. |
| Catalog Name | Catalog associated with the discovered asset. |
| Matched Data Source | Data Touch data source matched with the discovered database asset. |
| Mode | Indicates whether the database is a single node or part of a cluster. |
| Monitored | Indicates whether the database is actively monitored by the DAM Agent. |
| Database Name | Name of the matched database. |
| Database Type | Type of the matched database. |
| Server IP/Port | Server IP address and port of the matched database. |
| Sensitive Type Count | Number of sensitive types identified for the data source. |
| Actions | Provides access to information associated with the database record. |
Synchronize Discovery data
Select Sync Data in the upper-right corner to synchronize the page with the latest Discovery integration data.
Use synchronization when recently discovered or updated database assets are not yet reflected in the list.
Export Discovery Integration records
Select Export to export the displayed Discovery Integration records to an Excel file.
If filters are applied, the export contains the filtered results.
Refresh the Discovery Integration list
Select the Refresh button in the upper-right corner to update the information displayed on the page.
Data Source Definition
Select the Create Data Source icon in the Actions column to open the New page under the Settings > Data Source submenu.
Use the Create page to configure a Data Source for the corresponding discovered database asset.